This craft Subhanallah came about after I discovered a stack of Quality Street cellophane wrappers that I had saved ages ago. I had the idea for the craft but did not know how to execute it. When I googled I came to Fauxed Stained Glass. This website gave me some ideas. However I needed something more simplified and one that catered to Eid greetings without investing in a Cricut machine.
This is how I did this project with my children.
 Materials:
Overhead transparencies, cellophane papers, mod podge, paint brush or sponge applicator, black construction paper, scissors and a craft knife.
Steps:
1. Create a template of greetings that you want and print it on an overhead projector transparency. The rough side of the transparency usually faces up on the printer tray.
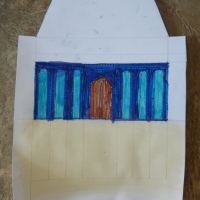
This is my template. You are most welcome to use it. I bolded the frames to make it look like stained glass. Easier than using electrician tape I guess.
2. Turn the printout the wrong side up. Apply a thin layer of mod pogde. Place a piece of cellophane paper. Keep repeating this until you have covered the entire surface of the template. You will have to apply mod podge over existing cellophane paper to apply more over it. The more random it is, the results look better.
Just a tip. Try to cover the Eid greeting part with lighter colour cellophane. This will allow the design to show better when light shines through Insya-Allah.
 DS1 trimming cellophane paper. His was more squarish cellophane pieces than random. He liked them that way.
 DS2 applying mod podge. I did say a thin layer of mod podge. Don’t worry ours was a mod podge pond! But Alhamdulillah the end result was fine and the children had fun.
3. Once you’ve done the gluing down of the cellophane. Let the transparency dry. Meanwhile you can cut out the shape of your “stained glass” on a black construction paper using a craft knife. Once dry, attach transparency to the construction paper. The “right side” i.e. smooth surfaced should be on the outer side within the construction paper frame.
4. Hang it up on your window or sliding door and enjoy. Alhamdulillah this was our finished work.

I have made the above templates and a couple more with the Eid greetings in Arabic as well as in English. Insha-Allah I hope this will be of a help to those who do not read Arabic or for those who want to make this craft in a class with children of different faith as well.
Stained Glass Template – English & Arabic


Umm An-Nu'man
September 6, 2010 at 9:50 am
Assalamu alaikum,
Masha’Allah, those came out very nice! I have one question, when you finish covering the cellophane, you cut out the same shape in the construction paper so there will be an open space the same shape of your decoration correct? So when you glue the cellophane to the contruction paper, you’re gluing the cellophane shape over a gap in the paper? I just want to make sure I understand so if I try this I won’t goof it…lol. Jazakillahu Khayr dear sis.
Muslim Learning Garden
September 6, 2010 at 10:25 am
Waalaikum Salaam Umm-Nu’man.
You are right. What I did was I reprinted the template on a regular paper. Used a sticky tape to hold it on a construction paper. I then used a craft knife to cut out the star, or mimbar or oval shape. That will leaves you a black construction paper with a gap in the centre. And as you said glue the transparency over the gap in the paper. Hope that helps Insya-Allah.
kathija
July 21, 2013 at 12:03 pm
slmz. its such a lovely idea. i would like to know if u printed the template on the transparent paper? i would like to use this idea for eid jzks
Umm Sayang
July 21, 2013 at 12:06 pm
Assalamualaikum Khatija.
The template was printed onto a transparency, a clear plastic sheet. Hope this helps.
Umm An-Nu'man
September 8, 2010 at 9:27 pm
Assalamu alaikum wa rahmatullah,
Jazakillahu khayr for the clarification *smile*. I think I may not do a stained glass version but maybe a collage style. These look quite versatile. Again, Jazakillahu Khayr dear sis!
Jasmine
October 29, 2011 at 1:05 pm
Salam oualeykoum, I am a French blogger ( http://blog.jasmineandco.fr ) and I like very much this DIY. Do you accept that I translate it on my blog, with in exchange for the links towards your blog inchaAllah ?
bye
Umm Sayang
October 29, 2011 at 8:49 pm
Waalaikum Salaam Jamine.
Insha-Allah you are most welcome to translate it into French for the benefit of your readers and just add a link to the original post. 🙂
Kay
December 8, 2011 at 8:28 am
MashaAllah what a good idea! I am a teacher and am interested in doing this project to teach about Eid. I looked at the template and it looks great! I don’t read Arabic though and have no idea what it says. I want to be able to tell the kids what it means, and it would also be nice to put the English translation underneath the Arabic. What does each template mean? Is there any way that you could put the meaning in English on each template?
Umm Sayang
December 9, 2011 at 8:45 am
Assalamualaikum Kay.
Alhamdulillah this craft will be used in your Eid project.
The first two templates read “Eid Mubarak”. Literally this means “blessed festival”.
The third template reads “Eid Saeed”. This means “Happy Eid”.
Insha-Allah, I will make and updated template with the English meaning this weekend.
Kay
December 9, 2011 at 2:13 pm
JazakAllah Khair, I really appreciate this!
Umm Sayang
December 11, 2011 at 9:49 am
Assalamualaikum Sister Kay.
I have updated the post with templates that has the Arabic Eid greeting as well as the English meaning. I have also added two more designs.
I hope this helps. I would love to see your class project with this craft. Please sent a picture if you don’t mind.
Kay
December 12, 2011 at 2:20 pm
Thank you! InshaAllah I will send photos before the week is over.
Kay
December 18, 2011 at 6:36 pm
JazakAllah sister, the students really enjoyed this. I have photos but I cannot figure out how to post them.
Lexy
October 31, 2012 at 9:59 am
Thank you so much for sharing this! I did this craft with a homeschool history class for our study of Islam. They turned out beautifully!
henry
December 19, 2012 at 11:35 pm
This looks amazing. I was wondering if we could share this on our blog? We will of course provide a link back to your blog and post your credits. Thank you for your sharing your wonderful craft ideas
Alexandra Sajda
December 25, 2012 at 9:49 am
if you dont have the tissue colored paper just use modge podge mixed with about 5 drops of food coloring and paint it on the transparency. I used the technique inside glass to make Moroccan glass lanterns
infousahabisnis.wordpress.com
March 16, 2015 at 12:06 am
Very nice post. I simply stumbled upon your blog and wanted to
say that I’ve really enjoyed browsing your blog
posts. In any case I’ll be subscribing on your rss feed and I am hoping you write once more very soon!
reemdn
November 17, 2017 at 1:22 am
Reblogged this on reemdn.